
![]()
![]()
![]()
![]()
![]()
![]()
![]()
![]()
![]()
![]()
![]()
![]()
If you were are the recent Kinetic Fire Festival or have spoken to either Charlie Cushing or myself face-to-face in the past six months, it's entirely possible you've heard of Charlie's Quantized Field Theory for poi and one of its applications: notation for props. We taught a class together at Kinetic in which Charlie enthusiastically explored the idea with the crowd while I, suffering from a nasty cold and laryngitis, did my best not to collapse and make everybody's day a little dreary. Now that I'm back in the beltway and have a few minutes to sit down, I wanted to write up a brief primer that describes some of the basic concepts of this notation so folks have a handy-dandy reference to work from and hopefully get some more people into the idea.
First off, what's a notation system and why do we need it? Simply put, notation is a written short-hand. Notation exists for music, dance, and I'm sure many other types of art. It lets you write down what you've got in your head accurately both so you can share it with others and have better recall in the future. For the mathematically inclined, it also lets you compare notated pieces to see some of the patterns they share.
How does this notation system work? It's based upon the idea of quantization, which is a fancy-ass way of saying, "take something kind of big and intimidating and break it into more manageable, smaller pieces." In this case, the idea is to take poi or other prop movement and break it up into smaller increments of movement and write down those increments. I'm going to build up this idea piece-by-piece both to shed some light on the thought process that gave rise to it and to break it up into smaller pieces to make it easier to understand...more quantizing, get it? ;)
 If you start with a poi in static spin, imagine taking a photograph of the movement every 1/8th of the way around the circle. You wind up with 8 photos of the poi oriented up/right, right, down/right, down, down/left, left, up/left, and up. Because we like for everything to be as confusing as possible, we've assigned numbers to these positions: 1, 2, 3, 4, 5, 6, 7, and 8 respectively. Why do the numbers go around clockwise? Because we made this thing up and we say so...moving on ;) In this particular case, we've taken one continuous movement and broken it up into 8 smaller bits.
This diagram actually is the most important thing to know when it comes to the notation system--we're going to come back to it very often. Think of this as a home base to come back to whenever shit gets too real.
Now that we have our home base to work from, how do we describe poi movement with it? When the poi moves between two points in this home base diagram, we write out the origin of the movement and its destination like on Google maps. Thus, we can say that if the poi rotates 1/2 of the way around the circle, it can go from 8 => 1, then 1 => 2, 2 => 3, and finally 3 => 4. We assume that between each of these two numbers the poi has taken a continuous path and that way we don't have to draw out all the infinitely small movements between them. With that in mind, we could write out a single rotation/beat of static spin like this:

| Poi Depart | Poi Arrive |
|---|---|
| 8 | 1 |
| 1 | 2 |
| 2 | 3 |
| 3 | 4 |
| 4 | 5 |
| 5 | 6 |
| 6 | 7 |
| 7 | 8 |
It takes 8 steps to complete the circle, each time moving sequentially from one point to the next. But what about if we wanted to perform a pendulum instead? Easy! Home base stays the same, but we're going to start from a different position: let's say 2.

| Poi Depart | Poi Arrive |
|---|---|
| 2 | 3 |
| 3 | 4 |
| 4 | 5 |
| 5 | 6 |
| 6 | 5 |
| 5 | 4 |
| 4 | 3 |
| 3 | 2 |
Again, this is 8 steps in the notation, but we never hit up points 8, 1, or 7. Why not? Because all these points are in the upward direction and pendulums only happen pointing down. Point 8 will always be pointing straight up into the sky.
 But what about hands? Well, there are currently two ways to track hand movements within this notation system. I'm going to cover the easy way in this post and come back to describe the harder (but more accurate) way in a future post. Let's go back to the home base diagram: in the same way that these numbers can be used to describe the position of the poi in static spin, so too can they be used to describe the position of the hand when performing flowers, in which case we can add a column to our notation for the hand's point of departure and arrival. A hand just turning around in a circle would look exactly like static spin:

| Hand Depart | Hand Arrive |
|---|---|
| 8 | 1 |
| 1 | 2 |
| 2 | 3 |
| 3 | 4 |
| 4 | 5 |
| 5 | 6 |
| 6 | 7 |
| 7 | 8 |
If we add the hand and poi together to create an extension, we wind up with the following notation:


| Poi Depart | Hand Depart | Hand Arrive | Poi Arrive |
|---|---|---|---|
| 8 | 8 | 1 | 1 |
| 1 | 1 | 2 | 2 |
| 2 | 2 | 3 | 3 |
| 3 | 3 | 4 | 4 |
| 4 | 4 | 5 | 5 |
| 5 | 5 | 6 | 6 |
| 6 | 6 | 7 | 7 |
| 7 | 7 | 8 | 8 |
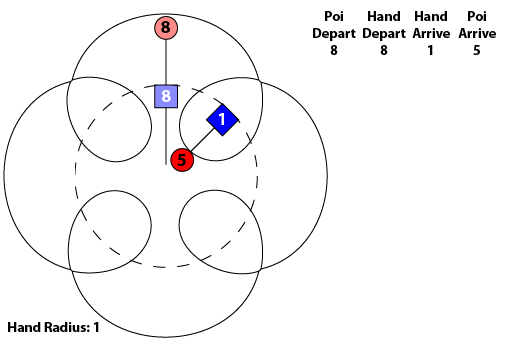
Again, it takes 8 steps to complete the circle, we're just describing it in bits of 1/8th of the circle. But wait--we've left something out! How big a hand circle are we creating? Is this a full-arm extension, a unit circle extension, or something in between? Here, we describe the radius (the distance from the center to edge) of the hand path's circle to eliminate the confusion. We write this out in units of 1-poi length because it's the only constant distance we can think of in spinning. All isolations, cateyes, and triquetras are performed in hand circles that are a proportion of the poi length. Let's say I'm performing this extension as a full-arm extension and my poi are the same length as my arm. In that case, we'd write out the extension like this:
| Poi Depart | Hand Depart | Hand Path Radius | Hand Arrive | Poi Arrive |
|---|---|---|---|---|
| 8 | 8 | 1 | 1 | 1 |
| 1 | 1 | 1 | 2 | 2 |
| 2 | 2 | 1 | 3 | 3 |
| 3 | 3 | 1 | 4 | 4 |
| 4 | 4 | 1 | 5 | 5 |
| 5 | 5 | 1 | 6 | 6 |
| 6 | 6 | 1 | 7 | 7 |
| 7 | 7 | 1 | 8 | 8 |
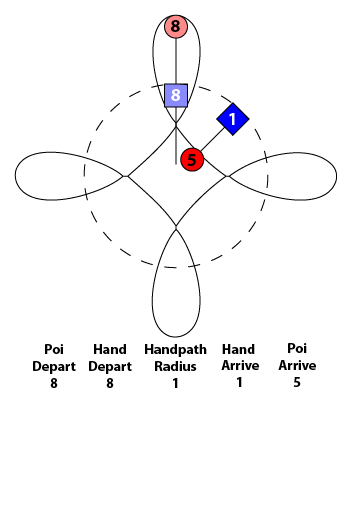
Okay, makes sense, yeah? What about if we write out something a bit more complicated--how about a 4-petal flower? Here is how it would be notated:

| Poi Depart | Hand Depart | Hand Path Radius | Hand Arrive | Poi Arrive |
|---|---|---|---|---|
| 8 | 8 | 1 | 1 | 5 |
| 5 | 1 | 1 | 2 | 2 |
| 2 | 2 | 1 | 3 | 7 |
| 7 | 3 | 1 | 4 | 4 |
| 4 | 4 | 1 | 5 | 1 |
| 1 | 5 | 1 | 6 | 6 |
| 6 | 6 | 1 | 7 | 3 |
| 3 | 7 | 1 | 8 | 8 |
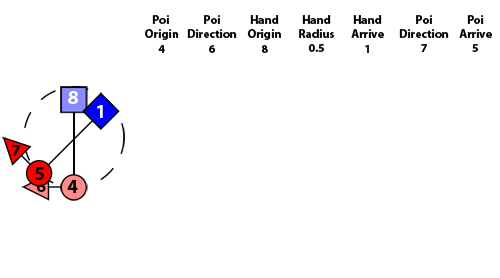
Whoa...what just happened there? Well, the hand numbers should be pretty easy to get--they're identical to those we had for the extension before. But what about the poi numbers? Well, the poi travels farther in a flower than the hand--it has more downbeats. This means that if we're taking 8 individual snapshots of the movement of creating a flower, the poi will appear to move farther in each snapshot than the hand. In the case of a 4-petal inspin flower like this, the poi actually moves 5 times farther in the course of the pattern than the hand. But why do the corner bits point to 5, 7, 1, and 3? Because for the poi, it's orientation is measured from the hand rather than the center of the body like the hand is.
For every point the hand hits, you can imagine that home base diagram sticking straight out from the hand itself in addition to the center of the circle the hand is rotating around. That way, no matter how big a hand path you're working with, the position of the poi need never change.
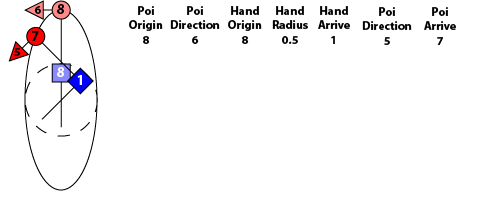
That's fine for inspin, but what about antispin? Let's take a look at one:

| Poi Depart | Hand Depart | Hand Path Radius | Hand Arrive | Poi Arrive |
|---|---|---|---|---|
| 8 | 8 | 1 | 1 | 5 |
| 5 | 1 | 1 | 2 | 2 |
| 2 | 2 | 1 | 3 | 7 |
| 7 | 3 | 1 | 4 | 4 |
| 4 | 4 | 1 | 5 | 1 |
| 1 | 5 | 1 | 6 | 6 |
| 6 | 6 | 1 | 7 | 3 |
| 3 | 7 | 1 | 8 | 8 |
Notice anything about the numbers there? They're identical to our inspin flower. How come? Because these two flowers are both 4-petal flowers, the poi is pointed the exact same direction in all the 8 points we're taking snapshots of. How can we fix this problem? The easiest way we can think of is to include another variable--this one will tell us what direction the poi is traveling in at any given moment. Fortunately, a system for determining direction already exist for us--that's right! We're going to use the home base diagram once again:

With that in mind, at every point where we take a snapshot of the poi, we're also going to take a snapshot of what direction it's traveling in at that point. This is going to change the game slightly for us in that now we have two extra variables to worry about at each point we take a snapshot of the poi. Now, we would write out our extension like this:

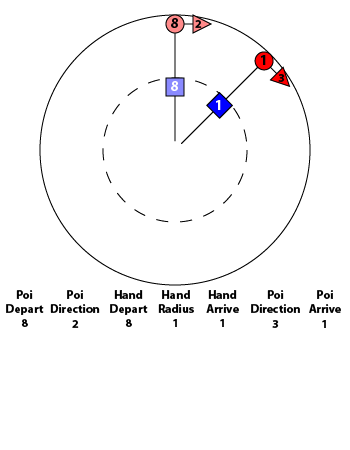
| Poi Depart | Poi Direction at Depart | Hand Depart | Hand Path Radius | Hand Arrive | Poi Direction at Arrive | Poi Arrive |
|---|---|---|---|---|---|---|
| 8 | 2 | 8 | 1 | 1 | 3 | 1 |
| 1 | 3 | 1 | 1 | 2 | 4 | 2 |
| 2 | 4 | 2 | 1 | 3 | 5 | 3 |
| 3 | 5 | 3 | 1 | 4 | 6 | 4 |
| 4 | 6 | 4 | 1 | 5 | 7 | 5 |
| 5 | 7 | 5 | 1 | 6 | 8 | 6 |
| 6 | 8 | 6 | 1 | 7 | 1 | 7 |
| 7 | 1 | 7 | 1 | 8 | 2 | 8 |
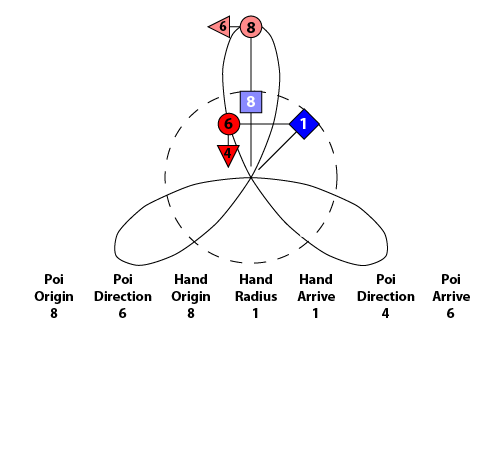
With that in mind, our 4-petal antispin flower now looks like this:

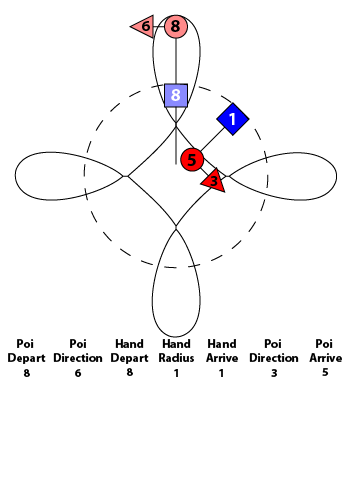
| Poi Depart | Poi Direction at Depart | Hand Depart | Hand Path Radius | Hand Arrive | Poi Direction at Arrive | Poi Arrive |
|---|---|---|---|---|---|---|
| 8 | 6 | 8 | 1 | 1 | 3 | 5 |
| 5 | 3 | 1 | 1 | 2 | 8 | 2 |
| 2 | 8 | 2 | 1 | 3 | 5 | 7 |
| 7 | 5 | 3 | 1 | 4 | 2 | 4 |
| 4 | 2 | 4 | 1 | 5 | 7 | 1 |
| 1 | 7 | 5 | 1 | 6 | 4 | 6 |
| 6 | 4 | 6 | 1 | 7 | 1 | 3 |
| 3 | 1 | 7 | 1 | 8 | 6 | 8 |
At our first point, with both the hand and the poi pointing straight up, we'll be moving our hand clockwise to the right our next move. Given that the poi is rotating antispin from it, we set the direction to the left, which is 6 on our home base diagram. At our next point, the hand is pointing up and to the right at 1 while the poi is pointed back toward the body down and to the left at 5. At this point, the poi is now traveling in a different direction from where it started--down and to the right at 3. That means that in an unbroken path, the poi has completed 3/8 of a rotation. When we move to our next point, the hand and poi will both be pointed straight out to the right at 2 for both and the poi is now set to travel straight up to the top point of the home base diagram, 8. To write out the notation for our 4-petal inspin flower, we do this:


| Poi Depart | Poi Direction at Depart | Hand Depart | Hand Path Radius | Hand Arrive | Poi Direction at Arrive | Poi Arrive |
|---|---|---|---|---|---|---|
| 8 | 2 | 8 | 1 | 1 | 7 | 5 |
| 5 | 7 | 1 | 1 | 2 | 4 | 2 |
| 2 | 4 | 2 | 1 | 3 | 1 | 7 |
| 7 | 1 | 3 | 1 | 4 | 6 | 4 |
| 4 | 6 | 4 | 1 | 5 | 3 | 1 |
| 1 | 3 | 5 | 1 | 6 | 8 | 6 |
| 6 | 8 | 6 | 1 | 7 | 5 | 3 |
| 3 | 5 | 7 | 1 | 8 | 2 | 8 |
Now when we begin the flower with both hand and poi pointed straight up at 8 for both, the poi is traveling in the same direction as the hand, to the right at 2 on our home base diagram. At the next point, the hand is pointed up and to the right at 1 while the poi is pointed down and to the right relative to the hand at 5. The direction of the poi is now 7--it has completed 5/8 of a complete rotation. The next step takes the hand and poi straight out to the right at 2 for both and the poi now moving in the downward direction at 4. If you compare the directions from the antispin flower and inspin flower, you'll note that at each snapshot we take the poi in the inspin flower is moving in completely the opposite direction as the antispin flower. To figure out which type of flower you're dealing with, draw out two points in sequence and follow the the shortest path the poi can complete around the circle to get to that position and bearing in mind that if the poi starts turning clockwise it will still be turning counterclockwise when it gets to its destination and vice-versa.
I know it's a lot to take in, but the good news is that if you can understand all this, you've got the basics of the notation system down and can begin to write and read it. Start experimenting with and next time I'll write out more about how to notate stalls, the more accurate way to define hand movement, and the idea of classes in this notation system. Bear in mind you can also write out handpaths that are counterclockwise by counting down from 8 rather than up to it. For now, read up, have fun, and let me or Charlie know if you have any questions.
Here are some additional shapes most of us are familiar with as rendered in QFT Notation:
Isolations:
| Poi Depart | Poi Direction at Depart | Hand Depart | Hand Path Radius | Hand Arrive | Poi Direction at Arrive | Poi Arrive |
|---|---|---|---|---|---|---|
| 4 | 6 | 8 | 0.5 | 1 | 7 | 5 |
| 5 | 7 | 1 | 0.5 | 2 | 8 | 6 |
| 6 | 8 | 2 | 0.5 | 3 | 1 | 7 |
| 7 | 1 | 3 | 0.5 | 4 | 2 | 8 |
| 8 | 2 | 4 | 0.5 | 5 | 3 | 1 |
| 1 | 3 | 5 | 0.5 | 6 | 4 | 2 |
| 2 | 4 | 6 | 0.5 | 7 | 5 | 3 |
| 3 | 5 | 7 | 0.5 | 8 | 6 | 4 |
For the mostpart, the numbers here are identical to the extension example cited above, but the orientation of the poi and the hand are flipped. That's because relative the hand, the poi will always be on the opposite side of our home base compass when the hand and the poi are tracing their way around the same circle. The other interesting change in this pattern is for the first time we're seeing a different sized hand path. Since an isolation is 1-poi length in diameter, the radius must be half that: 0.5 or 1/2.
Cateyes:
| Poi Depart | Poi Direction at Depart | Hand Depart | Hand Path Radius | Hand Arrive | Poi Direction at Arrive | Poi Arrive |
|---|---|---|---|---|---|---|
| 8 | 6 | 8 | 0.5 | 1 | 5 | 7 |
| 7 | 5 | 1 | 0.5 | 2 | 4 | 6 |
| 6 | 4 | 2 | 0.5 | 3 | 3 | 5 |
| 5 | 3 | 3 | 0.5 | 4 | 2 | 4 |
| 4 | 2 | 4 | 0.5 | 5 | 1 | 3 |
| 3 | 1 | 5 | 0.5 | 6 | 8 | 2 |
| 2 | 8 | 6 | 0.5 | 7 | 7 | 1 |
| 1 | 7 | 7 | 0.5 | 8 | 6 | 8 |
There are two primary elements that make this shape differ from those we've been playing with above. Again, the radius of the hand path is now 0.5, or 1/2 the length of the poi. For those of us familiar with the unit circle, there's nothing that unusual about this. The other element of note is that rather than having the poi orientation skip a few numbers at a time to create petals and arcs as in the previous flower examples, the numbers only change by 1 with every increment of movement.
This also opens up an issue that is slightly contentious: what direction does the poi spin when it is oriented at 1, 3, 5, and 7? Charlie and I have different answers to this question--I personally believe that the direction of the poi's movement should always be at a right angle to the poi tether and thus there are no points when the poi's direction of movement is out of resolution. Charlie, however, believes the direction of the poi's movement should be parallel to the instantaneous slope of the point the poi head is at. For those readers familiar with calculus, this the derivative of this point of the slope. Only when the poi is at 8, 2, 4, and 6 is its angle of movement the same as the derivative of the curve. In this case, the poi is out of resolution at each of those four points and would instead be written as such:
| Poi Depart | Poi Direction at Depart | Hand Depart | Hand Path Radius | Hand Arrive | Poi Direction at Arrive | Poi Arrive |
|---|---|---|---|---|---|---|
| 8 | 6 | 8 | 0.5 | 1 | n | 7 |
| 7 | n | 1 | 0.5 | 2 | 4 | 6 |
| 6 | 4 | 2 | 0.5 | 3 | n | 5 |
| 5 | n | 3 | 0.5 | 4 | 2 | 4 |
| 4 | 2 | 4 | 0.5 | 5 | n | 3 |
| 3 | n | 5 | 0.5 | 6 | 8 | 2 |
| 2 | 8 | 6 | 0.5 | 7 | n | 1 |
| 1 | n | 7 | 0.5 | 8 | 6 | 8 |
Triquetras:
| Poi Depart | Poi Direction at Depart | Hand Depart | Hand Path Radius | Hand Arrive | Poi Direction at Arrive | Poi Arrive |
|---|---|---|---|---|---|---|
| 8 | 6 | 8 | 1 | 1 | 4 | 6 |
| 6 | 4 | 1 | 1 | 2 | 2 | 4 |
| 4 | 2 | 2 | 1 | 3 | 8 | 2 |
| 2 | 8 | 3 | 1 | 4 | 6 | 8 |
| 8 | 6 | 4 | 1 | 5 | 4 | 6 |
| 6 | 4 | 5 | 1 | 6 | 2 | 4 |
| 4 | 2 | 6 | 1 | 7 | 8 | 2 |
| 2 | 8 | 7 | 1 | 8 | 6 | 8 |
Yeah...some of the shapes come out weird when broken into 8 chunks and some come out REALLY weird. A triquetra is one of those shapes that we're so used to seeing broken down in terms of its antispin petals and the arcs between them that it's a little jarring to see it broken down in such a way that it's focusing on points that are neither of these things. How come this one is so odd? The biggest reason is that, because we're only keeping track of points that are either straight along a top-bottom or side-to-side axis or those points in the middle of either one, most of the interior points of the triquetra wind up being at odd in-between angles that don't work terribly well with a resolution of 8 points. Nonetheless, it is an accurate record of which 8 points the poi and hand will go through in creating a triquetra. In fact, both of the transition points I usually use when moving in and out of a triquetra (the top petal and the arc between the two bottom petals) are represented here, so for my style of spinning, all the points I need are actually here already.
I had a hard time believing, at first, that the points outlined above actually fell along the path of a triquetra, but after going through and doing the math the hard way I quickly discovered it's an odd but kind of cool side-effect of this system of breaking down poi movement that there are no flowers that can't be broken up into 8 pieces. The simplest way to think of this flower is to frame it in terms of downbeats, wherein it is a 2-downbeat pattern for every single downbeat of the hand.
When viewed from this angle, we can easily see that when we move the hand a single increment from 8 to 1, the poi must move two increments as it travels twice as far in the same amount of time as the hand. Thus, the poi rotates not from 8 to 7 (because we're in antispin), but from 8 to 6. Sure enough, this is indeed the first increment of movement we see in the pattern above. A handy way to write out patterns quickly is to know the number of downbeats the poi has in relation to the hand and thus skip poi orientations by the number of downbeats of the pattern.
Like the cateye, this shape also features points where the poi direction is out of resolution if it is parallel to the derivative of the curve, so it would be written as such if we go with that system:
| Poi Depart | Poi Direction at Depart | Hand Depart | Hand Path Radius | Hand Arrive | Poi Direction at Arrive | Poi Arrive |
|---|---|---|---|---|---|---|
| 8 | 6 | 8 | 1 | 1 | n | 6 |
| 6 | n | 1 | 1 | 2 | n | 4 |
| 4 | n | 2 | 1 | 3 | n | 2 |
| 2 | n | 3 | 1 | 4 | 6 | 8 |
| 8 | 6 | 4 | 1 | 5 | n | 6 |
| 6 | n | 5 | 1 | 6 | n | 4 |
| 4 | n | 6 | 1 | 7 | n | 2 |
| 2 | n | 7 | 1 | 8 | 6 | 8 |
Some folks may have seen Charlie write out the formula for decoding QFT Notation like this: a,b(h(±x±y±z)h'){Class}a',b'
If this looks big and scary to you, I've got good news: if you've gotten this far you've already gotten through most of this formula. Let me translate it:
a = poi position at origin
b = poi direction of movement at origin
h(±x±y±z)h' = an alternative method for tracking the hand. I'll go over this in my next post on QFT. For now just know that tracking the hand position at origin, hand path radius, and hand position at arrival effectively is a slightly less accurate substitution for this part of the formula
{Class} = this is a method for abbreviating moves. It's not covered in this article, but it will be in the next one I write on the topic. It's not necessary to know this but knowing it can help save you some writing.
a' = poi position at arrival point
b' = poi direction of movement at arrival point
In other words, the tables I've written out above by and large are the same equation, but with the headings being what the variables represent rather than the variable names. Congratulations--you've been reading QFT Notation this whole article!
Needless to say, there is still a whole universe of stuff to be explained and analyzed in this system for writing, but this should at least be a good starting point for anybody who is interested in getting into the topic.
Acknowledgements: the biggest thank you of all the Charlie for dreaming up this whole concept and soliciting my input...especially when the suggestions I made were crap ;) Another big thank you to Alien Jon and Noel for their excellent feedback on the class at Kinetic and suggestions as to how to make this concept more digestible.